Long Exposure Techniques for Stunning Waterfalls and Ocean Shots
25 June 2025
Capturing the essence of moving water—whether it's a cascading waterfall or the rhythmic motion of ocean waves—requires more than just pointing and shooting. Enter long exposure photography, a technique that transforms ordinary water scenes into silky, dreamlike masterpieces.
But how do you master this technique? What settings should you use? And how do you avoid overexposure? Let’s dive into everything you need to know to take jaw-dropping long exposure photos of waterfalls and ocean waves. 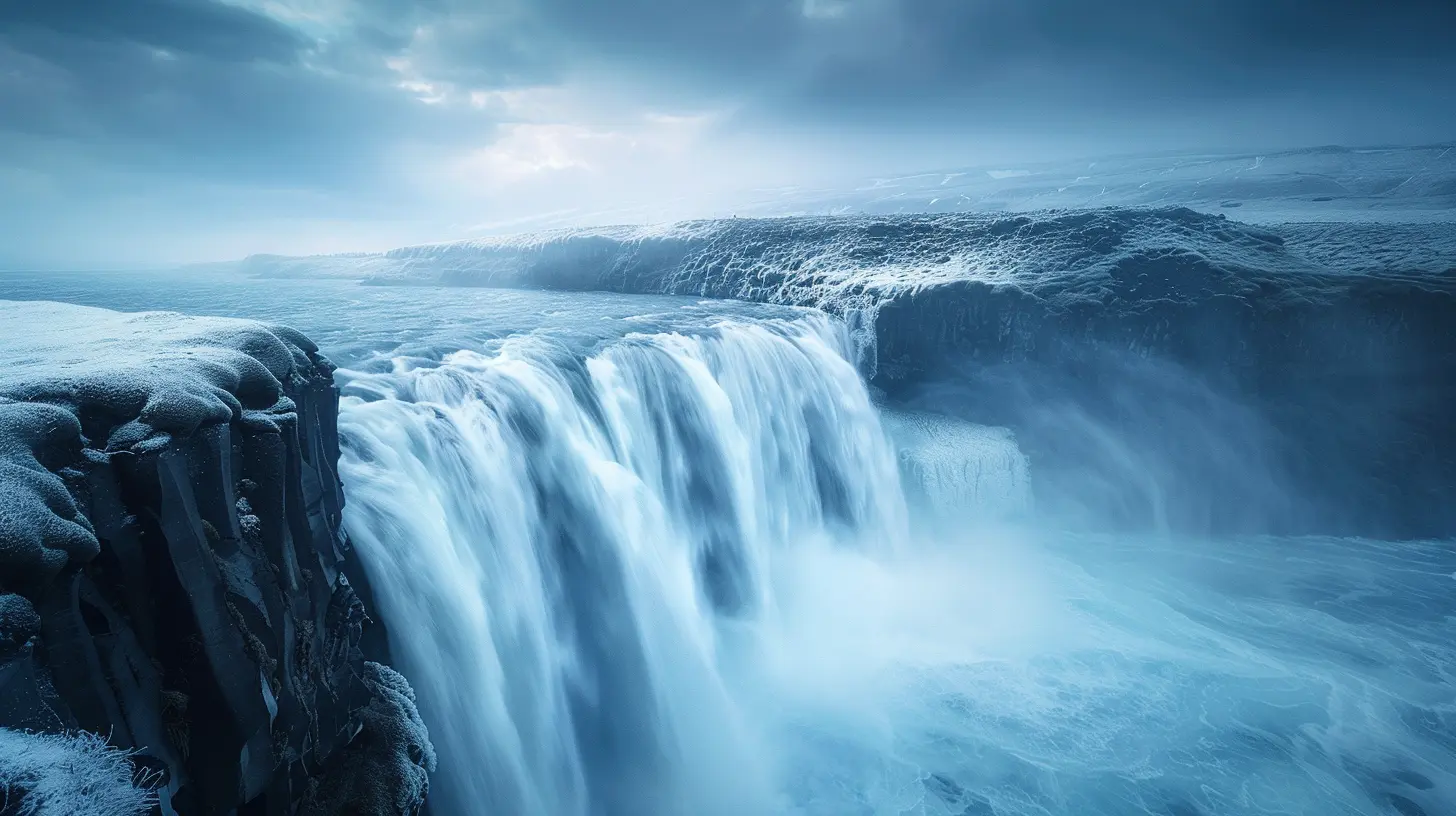
📸 What Is Long Exposure Photography?
Long exposure photography is all about slowing down your shutter speed to capture movement over time. Instead of freezing a moment, like you would when snapping a fast-moving subject, a long exposure smooths out motion, creating an almost ethereal effect.For waterfalls, this means silky, flowing water that looks like mist. For ocean shots, it means capturing the dreamy motion of waves, transforming them into a soft, fog-like texture. The result? A surreal and serene composition that instantly stands out.
But here’s the thing—long exposure photography isn’t just about dropping your shutter speed. It requires the right setup, proper planning, and a few essential techniques to get that perfect shot. 
📷 Essential Gear for Long Exposure Water Photography
Before you head out to photograph waterfalls or ocean scenes, you’ll need the right tools. Here’s what you should pack:1. A Sturdy Tripod
Long exposure requires absolute stability. Even the slightest shake can ruin your shot. A solid tripod prevents camera movement, ensuring crisp, sharp surroundings while allowing water to flow smoothly.2. Neutral Density (ND) Filters
An ND filter is your best friend in long exposure photography. It reduces the amount of light entering the lens, allowing you to use slower shutter speeds without overexposing your photo. Think of it as sunglasses for your camera.For waterfalls and ocean shots during daylight, you’ll want an ND filter with at least 6 to 10 stops of light reduction.
3. A Camera with Manual Settings
A DSLR or mirrorless camera with manual controls is essential. You need to adjust shutter speed, aperture, and ISO independently to get perfect exposure.4. A Remote Shutter Release or Timer
Pressing the shutter button manually can introduce vibrations. A remote shutter release or using your camera’s timer will eliminate camera shake.5. A Weather-Sealed Lens and Camera (If Possible)
Since you’ll be around water, a weather-sealed camera or a waterproof cover will protect your gear from splashes or unexpected rain.
⏳ Best Camera Settings for Long Exposure Water Photography
Now that you have the gear, let’s get into the technical side!1. Shutter Speed: The Key to Motion Blur
Shutter speed determines how long your camera's sensor is exposed to light. The slower the shutter speed, the more movement will be captured.- For Waterfalls: Start with a shutter speed between 1/4 sec to 2 sec for a silky motion effect. For an ultra-smooth misty look, experiment with 5-10 seconds.
- For Ocean Waves: If you want to capture soft, flowing waves, try ½ sec to 5 sec. To create a foggy ethereal effect, go even longer (10-30 sec).
2. Aperture: Keep It Narrow
A narrow aperture (higher f-stop number) helps maintain sharp details in your scene.- Use f/8 to f/16 to keep everything from foreground to background in focus.
- A smaller aperture (higher f-number) also reduces the amount of light entering the lens, helping balance exposure in bright conditions.
3. ISO: Keep It Low
Always set your ISO as low as possible (ISO 100 or 200). A higher ISO can introduce noise, which reduces the smoothness of your water effect.4. Focus: Use Manual Focus for Precision
Autofocus can struggle in long exposure scenes, especially in low light. Use manual focus to pinpoint sharpness and use your camera's live view for better accuracy.
☀️ Shooting in Different Lighting Conditions
Lighting can make or break your long exposure shot. Here’s how to adjust based on the time of day:1. Early Morning & Late Evening (Best Times to Shoot)
These are the golden hours for long exposure photography. The softer light and lower contrast make it easier to avoid overexposure. You may not even need an ND filter in low-light conditions.2. Midday (Most Challenging Time to Shoot)
Direct sunlight can cause blown-out highlights and harsh shadows. If you must shoot during midday, use a 10-stop ND filter to cut down on excess light.3. Cloudy & Overcast Conditions (Ideal for Waterfalls)
Cloudy days work wonders for waterfall photography. The diffused light eliminates harsh shadows and enhances the soft, dreamy effect of flowing water.🌊 Composition Tips for Waterfalls and Ocean Photography
A technically perfect shot means nothing without a compelling composition. Let’s go over some key compositional principles:1. Use Leading Lines
Look for natural elements like riverbanks, rocks, or shorelines that guide the viewer’s eyes toward your main subject.2. Experiment with Foreground Interest
Adding rocks, foliage, or reflections in the foreground creates depth and makes your shot more dynamic.3. Try Different Perspectives
Instead of always shooting eye-level, try low angles for a more immersive feel or high angles to showcase the flow pattern.4. Rule of Thirds for Balance
Place your waterfall or ocean horizon along the rule-of-thirds grid to create a more balanced and visually appealing image.🛠️ Post-Processing Tips for Perfecting Your Long Exposure Shots
Even the best shots can benefit from a little tweaking. Here’s how to enhance your waterfall and ocean photos:1. Adjust White Balance
Fine-tune the white balance to match the mood. Cooler tones work well for waterfalls, while warmer hues can enhance ocean sunsets.2. Enhance Contrast & Clarity
Use the contrast and clarity sliders in Lightroom or Photoshop to make details pop while maintaining the soft, dreamy texture of the water.3. Reduce Highlights & Boost Shadows
Lowering highlights prevents blown-out whites in the water, while lifting shadows can reveal more detail in darker areas.4. Remove Any Sensor Dust or Distractions
Use the healing brush tool to clean up unwanted spots, lens flares, or distracting objects in your image.🎯 Common Mistakes & How to Avoid Them
Let’s face it—even experienced photographers slip up. Here are the most common mistakes in long exposure water photography and how to avoid them:Mistake 1: Overexposing the Water
If the water looks too bright, try a stronger ND filter, lower your ISO, or use a smaller aperture (higher f-number).Mistake 2: Camera Shake Ruining the Shot
Always use a tripod and a remote shutter release—or at least the built-in timer—to eliminate vibrations.Mistake 3: Bad Composition
If your shot looks “off,” step back and rethink your framing. Incorporating leading lines and foreground elements can instantly improve your composition.Mistake 4: Ignoring the Weather & Light
If the conditions aren’t right, don’t force it. Shooting waterfalls under harsh midday light or ocean waves when it's too dark can lead to disappointing results.🌟 Final Thoughts
Mastering long exposure techniques for waterfalls and ocean shots takes patience, practice, and the right settings. But once you get the hang of it, the results are nothing short of magical.So grab your gear, find a stunning water scene, and start experimenting. The next breathtaking long exposure shot could be yours!
all images in this post were generated using AI tools
Category:
Travel PhotographyAuthor:

Winona Newman
Discussion
rate this article
2 comments
Zia Barker
Unlock the beauty of waterfalls and oceans with long exposure techniques! Use a sturdy tripod, experiment with ND filters, and aim for slow shutter speeds to capture silky water effects. Don’t forget to check lighting conditions for optimal results. Happy shooting!
August 20, 2025 at 3:56 PM
Winona Newman
Thank you for your insightful tips! Long exposure techniques truly elevate the beauty of water photography. Happy shooting indeed!
Henrietta Rivera
Great article! Your tips on long exposure techniques for capturing waterfalls and ocean shots are incredibly helpful. The step-by-step instructions make it easy for photographers of all levels to achieve stunning results. Thank you!
June 26, 2025 at 2:32 PM
Winona Newman
Thank you so much for your kind words! I'm glad you found the tips helpful. Happy shooting!